
The Software Testing Life Cycle (STLC) is a structured process that outlines the various testing activities carried out during different phases of software development. It plays a crucial role in ensuring that the software meets the required quality standards and that any bugs or issues are detected and fixed before the software is released to users.
Each phase of the STLC serves a specific purpose, from planning the tests to executing them, and finally, evaluating the results. Let’s take a closer look at the phases of STLC and understand their importance, along with some examples to clarify each step.
Table of Contents
What is Software Testing Life Cycle (STLC)?
The Software Testing Life Cycle (STLC) is a step-by-step process that helps testers systematically ensure that a software application is thoroughly tested. It provides a structured approach to identify and fix bugs or issues in the software before it’s released to users.
STLC consists of several phases, and each phase focuses on a specific task. It’s important to note that STLC is different from the Software Development Life Cycle (SDLC), which primarily focuses on the development and creation of the software. On the other hand, STLC is all about testing and ensuring that the software works as expected.
How Does STLC Work?
In the STLC, there are distinct phases, each with clear goals, deliverables (what gets produced at the end of the phase), and criteria (conditions that must be met for the phase to be completed).
Let’s break it down phase by phase:
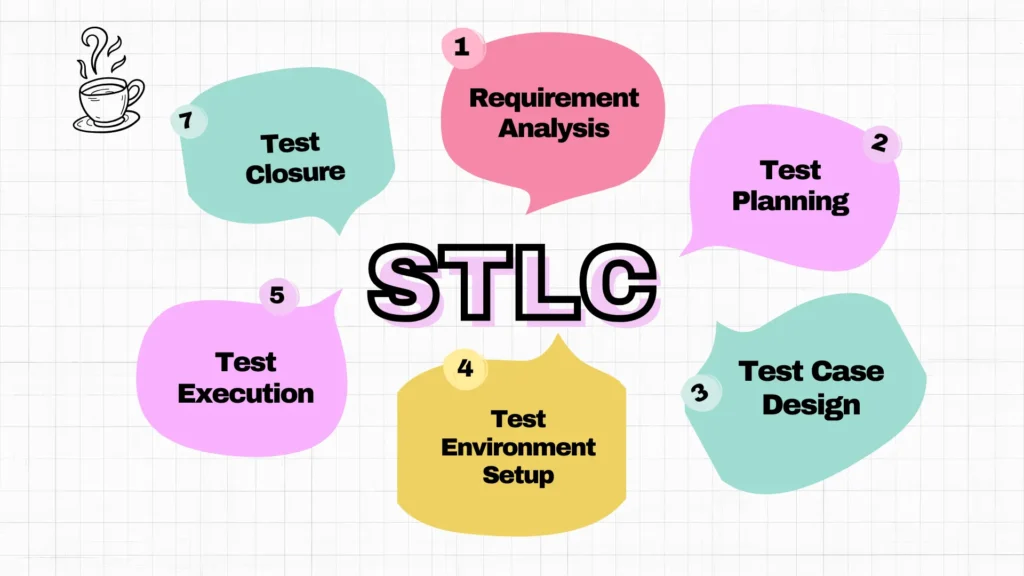
Phases of Software Testing Life Cycle (STLC)
The Software Testing Life Cycle (STLC) consists of six key phases, each designed to ensure that the software is thoroughly tested and meets the required quality standards. Every phase is essential for ensuring that no defects or issues are overlooked.
Let’s go over each phase in detail:
1. Requirement Analysis
Overview:
The Requirement Analysis phase is the first step in the testing process. During this phase, the testing team looks at the software’s requirements—both functional (what the software should do) and non-functional (how the software should perform). This phase is crucial because it helps testers figure out what exactly needs to be tested and how to approach the testing process. It also allows the team to clarify any doubts with the stakeholders and ensure that everything is clear before moving forward.
Objective of the Requirement Analysis Phase
The main goals of this phase are:
- Identify testable requirements: This means determining which requirements can be directly tested and validated.
- Clarify doubts with stakeholders: Testers need to clear up any ambiguities or unclear points in the requirements by discussing them with stakeholders, such as business analysts, developers, or project managers.
By the end of this phase, testers should have a clear understanding of what is expected from the software and what will be tested.
Key Activities in the Requirement Analysis Phase
Here are the important activities that happen during this phase:
- Study Functional and Non-Functional Requirements:
- Functional requirements define the features and functionalities the software must have. For example, a login page should allow users to enter their credentials and access the system.
- Non-functional requirements describe how the software should behave, like performance, security, or usability. For instance, how fast the application should load, or how secure user data must be.
- Identify Test Priorities and Scope:
Testers need to prioritize which requirements are the most important to test, based on their impact on the end users and business goals. The scope defines the boundaries of testing—what will be tested and what will not. - Collaborate with Development Team or Business Analysts for Clarification:
If there are any unclear aspects of the requirements, testers will discuss them with the development team or business analysts. This ensures that everyone is on the same page regarding what the software is supposed to do. - Check the Feasibility of Automation (If Applicable):
Some parts of testing, like repetitive tasks, can be automated. During this phase, testers evaluate which tests can be automated to save time in the long run. For example, if the application has many forms to test, automating those tests would speed up the process.
Deliverables of the Requirement Analysis Phase
At the end of the Requirement Analysis phase, the following deliverables are produced:
- Requirement Traceability Matrix (RTM):
The RTM is a document that links the requirements to the test cases. It ensures that all requirements have corresponding test cases, so nothing gets missed during testing. - List of Testable and Non-Testable Requirements:
Testers prepare a list that clearly marks which requirements are testable (can be verified through testing) and which ones are non-testable (either not measurable or not clear enough to create tests for).
Example of the Requirement Analysis Phase
Let’s say you’re testing an e-commerce application that has a Search feature. In the Requirement Analysis phase, testers need to ensure that all aspects of the search functionality are clear and testable.
Here’s how testers would go through the analysis:
- Study Functional and Non-Functional Requirements:
- Functional requirement example: The search feature should allow users to filter products based on categories like price, size, and color.
- Non-functional requirement example: The search results should load within 2 seconds to meet performance expectations.
- Identify Test Priorities and Scope:
- Test priorities: Testers would prioritize testing the core search functionality, as this is one of the most important features for the users.
- Scope: The scope would include testing filters (price, category, etc.), the display of search results, and the search bar’s ability to return results accurately.
- Collaborate for Clarification:
- Testers would ask questions like:
- What filters will be available in the search (e.g., price, category)?
- What happens if the search returns no results? Should an error message appear or a “no results found” message?
- Should the search results update in real-time as the user types, or should they only update when the search button is clicked?
- Testers would ask questions like:
- Check Feasibility of Automation:
- If the search feature involves frequent checks on filters or categories, testers might decide to automate these tests to save time in the future. For example, testing whether all available filters work with the search function could be automated for efficiency.
Summary
In the Requirement Analysis phase of the STLC:
- Testers review both functional and non-functional requirements to ensure they understand what needs to be tested.
- They work closely with stakeholders to clear up any questions or doubts about the software’s behavior.
- The outcome includes creating important documents like the Requirement Traceability Matrix (RTM), which connects each requirement to specific tests, and a list of testable vs non-testable requirements.
By the end of this phase, testers have a clear plan of what will be tested, how it will be tested, and any uncertainties that need to be resolved with the project team.
2. Test Planning
Alright, now that we’ve figured out the requirements and what we need to test, we move into the Test Planning phase. Think of this phase as creating the blueprint for how the testing is going to happen. It’s like preparing a detailed roadmap that tells you what’s going to be tested, how, and when. Without this phase, testing would be all over the place!
What’s the Goal Here?
The main goal of Test Planning is to set everything up for a smooth and successful testing process. We want to lay out exactly how the testing will be done, figure out what tools we’ll need, and how much time we’ll spend on each task. It’s all about making sure that everyone knows their role and the plan for getting things done.
What Happens During This Phase?
Here are the key things the team works on during Test Planning:
- Define the Test Strategy:
This is the big picture—the overall approach to how we’ll tackle testing. We decide on the types of testing we’ll do, like functional testing (checking if everything works as expected), performance testing (how fast the app runs), or security testing (making sure there are no security gaps).For example, if we’re testing a Search feature, the strategy might include:- Checking that it returns the correct results when you search for items.
- Testing the filters to make sure they work.
- Running performance tests to see how fast the search results show up when lots of people are searching at the same time.
- Estimate Resources, Effort, and Timelines:
This step is about figuring out what we need to get the job done. How many testers are needed? How long will it take to test everything? What devices or browsers will we be testing on?For instance, if we’re testing the Search feature on both mobile and desktop devices, we’ll estimate how much time each will take and how many testers we need. Maybe mobile testing will need 20 hours, while desktop testing will take 10 hours. This helps us build a realistic schedule. - Identify Required Tools and Environments:
We’ll figure out what tools we need to do our job well. If we’re automating tests, we’ll choose tools like Selenium. If we need to test performance, maybe we’ll use JMeter to simulate lots of users at once. We’ll also decide on the test environments—meaning, the devices, browsers, and operating systems we’ll be testing on.Let’s say we’re testing that same Search feature. We might need:- Selenium for automating the repetitive test cases (like verifying that the search results update correctly when filters are applied).
- JMeter to test how well the feature handles a lot of users searching at once.
- Different browsers (Chrome, Firefox) to ensure that the Search feature works everywhere.
- Assign Roles and Responsibilities:
Now, it’s time to divide the work! We assign specific roles to each team member so that everyone knows exactly what they’re doing. Some people might focus on writing test cases, while others will execute the tests, and some might handle automation or performance testing.For example:- One tester might focus on testing the filters in the Search feature.
- Another tester might work on testing different devices, like mobile phones and tablets.
- A third team member might be in charge of automating the Search results validation.
What Do We Deliver at the End of This Phase?
Once we’ve done all the planning, here’s what we’ll have:
- Test Plan Document:
This is the official guide to the entire testing process. It covers what we’re testing, how we’re testing it, and who’s doing what. It’s like the map that tells everyone where to go and how to get there. - Test Effort Estimation:
This is a breakdown of how much time and effort the team estimates will be needed for testing. It gives everyone a realistic idea of how long the testing will take and what resources will be required.
Let’s Break It Down with an Example
Let’s say we’re testing the Search feature for an e-commerce app (just to keep things interesting). We’re going to walk through how the Test Planning phase would go.
1. Define the Test Strategy:
First, we need to decide on the types of tests:
- Functional testing: Check that when you search for a product, the correct results show up.
- Performance testing: Test how fast the results load when many people are searching at the same time.
- Security testing: Make sure there are no issues like someone entering invalid characters in the search bar that could break the app.
2. Estimate Resources, Effort, and Timelines:
We’ll need testers to check the feature on different platforms:
- Mobile testing: 2 testers will focus on checking the Search feature on iPhones and Android phones. They’ll need about 20 hours.
- Desktop testing: 1 tester will check the Search feature on Chrome and Firefox browsers. This will take about 10 hours.
So, overall, we’re looking at about 30 hours of work.
3. Identify Required Tools and Environments:
We need the right tools to help us out:
- We’ll use Selenium to automate repetitive tests (like verifying that search results update with filters).
- JMeter will be used for performance testing to see if the Search feature can handle high traffic.
- We’ll test on both Android and iOS devices, and check the Search feature in Chrome and Firefox browsers.
4. Assign Roles and Responsibilities:
- Tester 1: Write test cases for the Search feature, focusing on different filters (price, brand, etc.).
- Tester 2: Perform manual tests on mobile devices (iPhone, Android).
- Tester 3: Write automated test scripts using Selenium to check the Search results.
- Tester 4: Perform load testing with JMeter to test how the app performs under heavy search usage.
Wrapping It Up
So, the Test Planning phase is all about getting everything ready for testing. It’s the phase where the testing team decides on the strategy, estimates how much time and resources will be needed, picks the tools, and assigns roles. By the end of this phase, everyone knows what needs to be done, how it will be done, and who will do it. This sets the stage for a smooth, organized testing process that helps ensure the software works perfectly!
3. Test Case Design
Now that we’ve got a solid plan for how the testing will happen, it’s time to actually create the test cases. Think of test cases as detailed instructions or recipes for the testers—each one tells them exactly what to do, what to expect, and how to know if something is working correctly. This phase is all about making sure that every possible scenario gets covered, whether things go perfectly (positive) or go wrong (negative). So, let’s dive into it!
What’s the Goal Here?
The Test Case Design and Development phase aims to define how testing will be executed for each functionality of the software. The goal is to create test cases that cover every situation that might arise during testing, ensuring that the software behaves as expected in all cases.
What Happens During This Phase?
Here’s what the team does during this phase:
- Write Detailed Test Cases:
This is where the actual test cases are created. A test case should include specific steps, what inputs should be provided, what expected outcomes are, and the pass/fail criteria. It’s like writing a clear set of instructions so testers know exactly what to do to check if the software is working. For example, if you’re testing the Search feature of an e-commerce website, a test case might be:- Test Case Name: Verify search results for valid product names.
- Pre-condition: User is logged in and on the search page.
- Test Steps:
- Enter a valid product name (e.g., “laptop”) in the search bar.
- Press the search button.
- Expected Result: Search results should show products related to the name “laptop”.
- Pass/Fail Criteria: If results show laptops, the test passes. If not, the test fails.
- Review Test Cases for Accuracy and Coverage:
Once test cases are written, the team reviews them to ensure they are complete and accurate. We check if every functionality has a corresponding test case, and we make sure that the test cases cover both positive and negative scenarios.- Positive Test Cases check for the correct behavior when everything works as expected.
- Negative Test Cases check how the system handles things going wrong (like entering incorrect data or performing actions in an unexpected way).
- Prepare Test Data:
Test data is the information you’ll use while running the test cases. For example, if you’re testing the Search feature, the test data would include different search terms like product names, invalid characters, empty strings, etc. Having the right test data helps ensure that you’re testing every possible situation.
Deliverables of the Test Case Design Phase
By the end of this phase, the following should be ready:
- Test Cases:
A collection of test cases that will guide the testing process. These are the actual instructions testers will follow to check the software. - Test Data:
A list of all the data that will be used during the testing, such as valid inputs, invalid inputs, and edge cases. - Updated RTM (Requirement Traceability Matrix):
This document maps each test case to the requirements it’s verifying. It ensures that all requirements are covered by test cases, so nothing is missed during testing.
Example: Testing the “Search” Feature
Let’s say we’re testing the Search feature of an e-commerce website. Here’s how the Test Case Design and Development phase would look for this feature:
1. Write Detailed Test Cases:
- Positive Test Case:
- Test Case Name: Verify search results for valid product names.
- Pre-condition: User is on the website’s search page.
- Test Steps:
- Type “laptop” into the search bar.
- Press the search button.
- Expected Result: The search results should display products related to laptops.
- Pass/Fail Criteria: If the search results show laptops, the test passes. If the results show something unrelated, the test fails.
- Negative Test Case:
- Test Case Name: Verify behavior with invalid search input (special characters).
- Pre-condition: User is on the search page.
- Test Steps:
- Type “@#$%” into the search bar.
- Press the search button.
- Expected Result: The system should show an error message or indicate no results were found.
- Pass/Fail Criteria: If the system shows an error message or displays no results, the test passes. If it behaves incorrectly, the test fails.
- Boundary Test Case:
- Test Case Name: Test search field’s character limit.
- Pre-condition: User is on the search page.
- Test Steps:
- Enter a single character (e.g., “A”) in the search bar.
- Press the search button.
- Enter the maximum allowed characters (e.g., 100 characters) in the search bar.
- Press the search button.
- Expected Result: The system should accept the input and return relevant results, regardless of the length of the search query (as long as it’s within the character limit).
- Pass/Fail Criteria: If both short and long searches return relevant results, the test passes. If the search fails for any of these scenarios, the test fails.
2. Review Test Cases for Accuracy and Coverage:
The testing team will go through the test cases to make sure they cover everything:
- Positive Test Cases: Do we have test cases that check the correct behavior when everything works as expected? (Yes, we’ve got that for searching valid product names.)
- Negative Test Cases: Have we checked how the system reacts to incorrect data? (Yes, we’ve included tests for invalid characters.)
- Edge Cases (Boundary Tests): Have we tested for extremes, like the minimum and maximum allowed inputs? (Yes, we’ve got a boundary test for the search field.)
3. Prepare Test Data:
To run the tests, we need to make sure we have the right test data:
- Valid product names: “laptop”, “smartphone”, “headphones”.
- Invalid input: Special characters like “@#$%”.
- Boundary values: A single character (e.g., “A”) and 100 characters (e.g., “aaaaaaaaaaaaaaaaaaaaaaaa…”).
Summary
The Test Case Design and Development phase is where the action starts to happen. We write the detailed test cases that will guide our testing, making sure we cover positive, negative, and boundary cases. We also prepare all the test data we’ll need and review everything to make sure we’re not missing anything.
By the end of this phase, the testing team has a set of clear instructions on how to test every functionality, and everyone knows exactly what data to use and what results to expect. With all this in place, the testing will be thorough, effective, and efficient!
4. Test Environment Setup
Alright, so we’ve written our test cases, and now we need to make sure that everything is ready to go for actual testing. This is where the Environment Setup phase comes in. In this phase, we create an environment where we can run the tests, and it has to be as close as possible to the production environment—the real environment where the app or system will run once it’s live.
Think of it like setting up a rehearsal space before the big performance. You want everything (hardware, software, tools) to be in place and working smoothly so when the test runs, it’s as realistic as possible.
Note: In some projects, pre-configured environments are provided OR testers may not be responsible for creating the test environment. However, Testers verify if the environments are ready for testing.
What’s the Goal Here?
The main goal of the Environment Setup phase is to create an environment where test execution can happen smoothly. This environment should mimic the real-world conditions where the software will actually run, ensuring that our test results are accurate and reliable.
What Happens During This Phase?
Here’s a breakdown of what the team does during this phase:
- Set Up Hardware and Software Requirements:
The first step is to make sure that the hardware (servers, computers, devices) and software (operating systems, applications) are ready for testing. The test environment needs to have all the necessary components that will allow the software to run just like it would in the real world. This could include things like:- Setting up specific operating systems (Windows, Mac, Linux).
- Ensuring that the correct version of the app is installed.
- Ensuring that hardware like mobile devices, desktops, or servers are available for testing.
- Install Necessary Tools:
In this step, the team installs any tools that will be used for testing. These tools could include:- Test Management Tools like Jira, to manage and track test cases and defects.
- Automation Tools like Selenium, if we’re automating any tests.
- Performance Testing Tools like JMeter, to simulate heavy traffic and check how the system performs under stress.
- Configure Test Servers and Databases:
Now, we need to set up the test servers and databases that will be used during testing. This step ensures that the data is properly managed and the server behaves just like it will in production. The database should be configured to store and retrieve the data that our application will use during tests.For example, if we’re testing a Search feature, we want to make sure that the test database has enough product data to run realistic tests. This will allow us to simulate actual search queries and see how the system handles them. - Verify Environment Readiness with a Smoke Test:
After everything is set up, it’s time for a smoke test—this is a quick check to see if the environment is actually ready to run the tests. Think of it like a “quick health check” to make sure everything is in place and working. If the smoke test passes, we know the environment is good to go.
Deliverables of the Environment Setup Phase
By the end of this phase, you should have:
- Test Environment:
This is the actual setup of the hardware, software, tools, servers, and databases that will be used for testing. It’s the environment where all the tests will be executed. - Smoke Test Results:
These are the results from the smoke test, which verifies that the test environment is ready for more in-depth testing. If the smoke test passes, we’re good to go. If not, we need to fix the issues before starting the actual tests.
Example: Setting Up the Environment for the “Search” Feature
Let’s say we’re testing the Search feature of an e-commerce website. Here’s how we would set up the environment:
1. Set Up Hardware and Software Requirements:
- We need to test the Search feature on both desktop and mobile devices. So, we’ll need laptops, tablets, and smartphones available for testing.
- For software, the test environment should be running the correct versions of:
- Windows (for desktop testing),
- Android and iOS (for mobile testing),
- The latest version of the e-commerce website with all the necessary dependencies installed.
2. Install Necessary Tools:
- Selenium: If we’re automating some of the search tests, we’ll set up Selenium on the test machines to run those tests automatically.
- Jira: We’ll use Jira to track the test cases, and report any issues found during testing.
- JMeter: We might use JMeter if we want to test how well the search feature handles a lot of users searching at the same time (load testing).
3. Configure Test Servers and Databases:
- Test Servers: We need to make sure the application’s backend is set up on a server just like the real server it will run on in production.
- Test Database: For realistic testing, we need a test database with enough product data (e.g., 1000+ products) to simulate actual searches. We also need to configure the database so that the Search feature can query it properly and return results.
4. Verify Environment Readiness with a Smoke Test:
Once everything is set up, we run a smoke test. Here’s what that might look like:
- Test whether the Search feature can load properly on all devices (desktop, mobile).
- Run a basic search query to make sure the system is returning results.
- Verify that the database can be accessed and queried.
If everything passes the smoke test (i.e., the Search feature is working fine and there are no server/database issues), we know the environment is ready for full-scale testing.
Summary
In the Environment Setup phase, we prepare everything we need to run the tests: setting up the hardware and software, installing necessary tools, configuring test servers and databases, and running a quick smoke test to ensure everything works.
By the end of this phase, we have a fully functional test environment that mirrors the real-world production environment as closely as possible. This makes sure that our test results are realistic and reliable.
So, when the actual testing begins, we can feel confident that we’ve got everything set up for success! 😊
5. Test Execution
So far, we’ve done all the preparation—writing test cases, setting up the environment, and getting everything ready for testing. Now, it’s time to actually test the software! This is where the magic happens—the Test Execution phase.
In this phase, we run all those test cases we created and see if the software behaves the way it’s supposed to. It’s like putting the software through its paces to make sure it’s working smoothly and fixing any issues that come up.
What’s the Goal Here?
The main goal of Test Execution is to validate that the software behaves as expected under different scenarios. We want to make sure everything works properly and identify any bugs or issues that need fixing. It’s all about running those tests and making sure the software is ready to go!
What Happens During This Phase?
Here’s what the team does during this phase:
- Execute Test Cases Manually or Using Automation Tools:
This is where we actually run the test cases we created earlier. Test cases can be executed in two ways:- Manually: A tester follows the steps in the test case and checks whether the software behaves as expected.
- Automated Testing: In cases where we want to speed up testing, we use automation tools (like Selenium or JUnit) to run the tests automatically. This is useful for repetitive tasks or testing large volumes of data.
- Log Defects in a Defect-Tracking Tool:
If any test fails or something doesn’t work as expected, the tester will log a defect. A defect is essentially a bug or problem in the software. The tester will enter details about the defect in a defect-tracking tool (like Jira or Bugzilla), which helps track and manage all issues found during testing.For example, if the Search feature fails to return results correctly or crashes, that would be logged as a defect. - Retest Fixed Defects and Perform Regression Testing:
Once the development team fixes a defect, we don’t just assume it’s fixed—we need to retest it to make sure the issue is resolved. Additionally, we perform regression testing to make sure the new fix hasn’t caused any other issues elsewhere in the software. It’s like checking that a new patch didn’t break anything else that was working fine before.- Retesting: Verify that the specific defect is fixed.
- Regression Testing: Ensure that new code changes haven’t negatively affected other parts of the system.
Deliverables of the Test Execution Phase
At the end of this phase, the following will be delivered:
- Test Execution Reports:
These reports summarize the results of the test execution—what tests were run, which passed, and which failed. It helps the team see the overall health of the software. - Defect Logs:
These are logs of all the defects or bugs found during testing. Each defect is tracked with details like:- A description of the issue.
- The severity or priority of the defect.
- Steps to reproduce the defect.
- Status (open, closed, or fixed).
Example: Testing the “Search” Feature
Let’s say we’re testing the Search feature of an e-commerce website. Here’s how the Test Execution phase would play out:
1. Execute Test Cases:
We run the test cases we’ve written earlier. Some test cases might be executed manually, while others could be automated.
- Manual Test Case Example:
- Test Case: Verify that the search results narrow down when applying filters like price or category.
- Steps:
- Search for a product, e.g., “laptop”.
- Apply the price filter (e.g., range: $500 – $1000).
- Apply the category filter (e.g., “Electronics”).
- Expected Result: The search results should show laptops within the $500 – $1000 price range and under the “Electronics” category.
- Automated Test Case Example: We can use an automation tool like Selenium to automatically run tests like:
- Verifying that the search feature works for 1000+ product names.
- Checking that the system handles special characters correctly.
2. Log Defects:
If anything goes wrong during testing, we log a defect. For example, let’s say the Search feature crashes when we try to search for a product with special characters (like “#%@!”). We would log a defect:
- Defect: “System crashes when searching for special characters.”
- Severity: High (since it causes a crash).
- Steps to Reproduce:
- Go to the search page.
- Type “#%@!” in the search bar.
- Press the search button.
- Expected Result: The system should show an error message or return no results, not crash.
3. Retest Fixed Defects and Perform Regression Testing:
Let’s say the development team fixes the crash issue. After they fix it, we retest the defect to ensure the fix works. We’ll also perform regression testing to make sure the fix didn’t break any other part of the system.
For example:
- Retesting the Fixed Defect: Check that the Search feature no longer crashes when searching for special characters.
- Regression Testing: Make sure other functionalities, like adding products to the cart or viewing product details, still work correctly after the fix.
Summary
The Test Execution phase is all about putting the software to the test. We run test cases to check if everything behaves as expected, log any defects we find, and retest the fixes to ensure the issues are resolved. This phase gives us a clear picture of whether the software is ready to move forward or if more work is needed.
By the end of this phase, we have:
- A test execution report that summarizes the results of all tests.
- A defect log that tracks all the issues found and their statuses.
6. Test Closure
After all the hard work in previous phases—writing test cases, setting up environments, executing tests, and fixing issues—we finally reach the last phase of the Software Testing Life Cycle (STLC): the Test Closure phase. This is where the testing team wraps things up, takes a step back, and evaluates how everything went.
What’s the Goal Here?
The main goal of Test Closure is to ensure all planned testing activities are completed and everything is documented for future reference. It’s about reflecting on the testing process, gathering insights, and closing the testing phase on a solid note. This also helps in future projects by learning from what worked and what didn’t.
What Happens During This Phase?
Here’s a breakdown of the activities during the Test Closure phase:
- Analyze Test Metrics and Outcomes:
The team looks at how the testing went. This involves analyzing key metrics such as:- How many test cases were executed?
- How many passed, failed, or were blocked?
- How many defects were found, and how many were resolved?
- Prepare Test Summary Reports:
The team prepares a Test Summary Report that provides a detailed overview of the testing process. This report typically includes:- A summary of what was tested.
- The number of tests executed and their outcomes (pass, fail, or blocked).
- The severity of defects found.
- Any major issues or risks identified during testing.
- Document Lessons Learned:
During testing, the team learns a lot—about the software, the process, the tools, and even the team dynamics. In this step, those lessons are documented so that future projects can benefit from the knowledge gained. For example:- If certain tests consistently failed, what could be improved next time?
- Were there any tools or techniques that worked particularly well or didn’t work at all?
- What communication or process improvements could be made?
- Archive Test Artifacts for Future Reference:
Finally, all the test-related documents and artifacts—like test cases, test data, logs, and reports—are archived and stored for future reference. These artifacts can be helpful if the application is revisited later, or if there’s a need to investigate any defects that were reported during testing.
Deliverables of the Test Closure Phase
By the end of this phase, the following deliverables will be produced:
- Test Summary Report:
A report that summarizes the entire testing process, including the number of tests executed, passed, failed, or blocked, and key findings. - Lessons Learned Document:
A document that records insights and improvements identified during the testing process to help improve future projects.
Example: Wrapping Up Testing for the “Search” Feature
Let’s say we’ve just finished testing the Search feature of an e-commerce site. Here’s how the Test Closure phase would look:
1. Analyze Test Metrics and Outcomes:
We analyze the test results for the Search feature:
- Number of test cases executed: 25
- Passed: 20
- Failed: 3
- Blocked: 2 (e.g., issues with the test environment or external systems).
We also look at the defects:
- High-priority defects: 2 defects related to search results not displaying correctly.
- Low-priority defects: 1 cosmetic issue with the search bar appearance.
2. Prepare Test Summary Report:
We create a Test Summary Report that includes:
- A detailed description of the Search feature and what was tested (filters, search accuracy, handling of special characters, etc.).
- The number of test cases executed, passed, failed, and blocked.
- A summary of defects found and their severity.
- A conclusion on the overall quality of the Search feature.
The report might say something like:
“Out of 25 test cases executed for the Search feature, 20 passed successfully. However, 3 failed related to filter functionality not working as expected. These defects are in the process of being fixed, and the feature is 80% ready for release.”
3. Document Lessons Learned:
Here are some lessons learned from testing the Search feature:
- Lesson 1: The search filters worked well for most categories, but failed when the price filter range was too broad. We should test edge cases like this earlier in the future.
- Lesson 2: There was an issue with handling special characters in the search field, which wasn’t caught in earlier stages of testing. We should include more detailed validation for inputs in the future.
- Lesson 3: Automation of basic search tests worked smoothly and saved a lot of time, but we need more data for performance testing in future projects.
4. Archive Test Artifacts for Future Reference:
We archive all test-related documents, including:
- The Test Cases for the Search feature.
- Test Logs and Defect Reports for reference in case any issues arise after release.
- Test Data used during testing (e.g., a list of product names and categories for search queries).
These documents are saved in a shared repository for easy access in case the software is updated in the future or if there’s a need to investigate any defects post-release.
Summary
In the Test Closure phase, we take a step back and make sure everything is wrapped up and documented. We evaluate the testing process, analyze the results, and gather valuable lessons for future projects. This phase is all about reflection, ensuring that the testing process is complete, and setting the stage for continuous improvement.
By the end of this phase, we have:
- A Test Summary Report that gives a clear picture of the testing results.
- A Lessons Learned document that helps us improve for the future.
- All test-related documents archived for reference.
Benefits of STLC
When you follow the STLC, the testing process becomes more organized, predictable, and efficient. Let’s dive into the main benefits:
1. Systematic Testing Approach: Each Phase is Well-Defined
One of the best things about STLC is that each phase of testing is well-defined and structured. This means that everyone on the team knows exactly what to do, when to do it, and why they’re doing it. There’s no guesswork, and every step builds on the one before it.
Why is this important?
By following a systematic approach, you ensure that no step is missed. Each phase has a specific goal and a clear set of activities, so the testing process is thorough and complete. This helps to prevent errors that can happen when testing is rushed or unorganized.
Example:
Let’s say you’re testing a login page for a web app. If you follow the STLC, you’ll start by analyzing the requirements (what does the login need to do?), then move on to planning (how will you test it?), create detailed test cases, execute them, and finally close the phase with reports and lessons learned. You’re less likely to miss testing something critical, like error messages for wrong passwords, because the steps are clear.
2. Early Defect Detection: Bugs Are Identified Early in the Process, Reducing Costs
One of the biggest advantages of STLC is the ability to identify defects early. Since testing starts at the beginning of the project and happens in a structured way throughout, you can spot bugs as soon as they appear. This means you can fix them faster, before they become bigger issues.
Why is this important?
Finding bugs early is crucial because the earlier you find and fix a bug, the cheaper it is to fix. A bug found in the planning phase is much easier and less expensive to fix than one found after the software is released. Early bug detection also helps to ensure that the software is built right from the start.
Example:
Imagine you’re testing the Search feature of an e-commerce site. If you find that the search results don’t display correctly during the Test Planning or Test Case Design phase, you can communicate with the development team to fix it right away. This prevents a situation where the search feature fails in the Test Execution phase, which would cost more time and resources to resolve.
3. Improved Quality: Thorough Testing Ensures the Software Meets User Expectations
By following STLC, you can ensure that the software meets user expectations and works flawlessly. Each phase of testing is designed to thoroughly assess different aspects of the software, from functionality to performance to security. This results in a higher-quality product.
Why is this important?
Quality is key to user satisfaction. Thorough testing means that you’re not just checking if the software works, but also if it works correctly and consistently. By addressing bugs and issues early and covering all test scenarios, you can be confident that the software will provide a positive user experience.
Example:
Let’s say you’re testing an e-commerce platform. If you use STLC, you would thoroughly test the checkout process, making sure users can add products to their cart, apply discounts, enter payment info, and complete the purchase without issues. By following the process, you ensure that the feature works for all users—whether they’re using a desktop or mobile device, whether they’re logged in or not, and so on.
4. Efficient Resource Utilization: Roles and Responsibilities Are Clearly Defined
Another benefit of STLC is that it makes resource allocation more efficient. When everyone knows what their role is, there’s no overlap or confusion. Tasks are assigned to the right people based on their skills and expertise, which helps to make the process more efficient.
Why is this important?
By clearly defining roles and responsibilities, you make sure that everyone is focused on what they do best. This minimizes wasted time and effort, ensuring that the testing process is as smooth and efficient as possible. You also make sure that all necessary resources (like testing tools, environments, and skilled testers) are available when needed.
Example:
In a testing team, you might have testers who specialize in manual testing, others who specialize in automated testing, and some who are experts in performance testing. With STLC, each tester knows exactly which tasks they are responsible for. For example, the manual testers will focus on functional testing, while the automation testers handle repetitive tests that can be automated.
5. Enhanced Documentation: Each Phase Produces Valuable Artifacts for Future Reference
STLC ensures that documentation is a key part of the process. At every phase, you create important documents—test plans, test cases, defect logs, test reports, and so on—that serve as valuable artifacts. These documents aren’t just for the current project; they’re also helpful for future projects and maintenance.
Why is this important?
Having well-documented artifacts means that you have a clear record of all testing activities. This helps you track progress, understand why decisions were made, and refer back to testing details if issues arise later. Additionally, good documentation helps new team members get up to speed quickly, as they can refer to these records when needed.
Example:
After testing a Search feature, you would have test cases that detail how the search should behave with various inputs (valid product names, special characters, etc.), a test execution report that summarizes what worked and what didn’t, and defect logs that track any bugs found. If there’s ever a need to update the search feature in the future, you can refer to these documents to understand what was tested and how things were fixed.
In Summary: Why STLC is Awesome
STLC provides a structured and organized testing approach that offers many benefits. Here’s a quick recap:
- Systematic Testing Approach ensures no step is missed.
- Early Defect Detection helps to find and fix bugs early, saving time and money.
- Improved Quality makes sure the software meets user expectations.
- Efficient Resource Utilization means that everyone knows their role, and the process is streamlined.
- Enhanced Documentation creates a valuable record of all testing activities for future reference.
By following STLC, you’re setting up your testing process to be thorough, organized, and efficient—leading to better software and a better user experience.
Conclusion
In summary, the Software Testing Life Cycle (STLC) is a structured framework that guides the testing process, ensuring thorough, systematic testing from start to finish. Each phase, from Requirement Analysis to Test Closure, plays a vital role in ensuring the software is rigorously tested, defects are caught early, and all aspects of the software are thoroughly validated. The clear objectives and deliverables of each phase help testers stay focused and organized, leading to higher-quality software that meets both functional and user expectations.
The benefits of following STLC are clear: early defect detection, improved software quality, and efficient resource utilization. With a well-documented testing process, teams can track progress, improve their methods, and ensure a smooth workflow throughout the project. In the end, STLC is not just about following a process—it’s about delivering a product that’s reliable, user-friendly, and bug-free, making it a key to successful software development.
Stay Connected & Keep Learning!
Don’t miss out on more amazing articles and expert insights here at Testers Journey Blogs! Be sure to explore our comprehensive Testers Journey Tutorials for hands-on tips and tricks to level up your testing skills.
Got any questions or brilliant ideas for future topics? Drop a comment below—we’d love to hear from you!
For more Exclusive tutorials, insider insights, and the latest updates, follow us on our Blogs, YouTube Channel, and Facebook Page! Join the community, stay informed, and let’s continue this journey together. Happy testing and coding! 🚀
Frequently Asked Questions
What is the difference between STLC and SDLC?
STLC (Software Testing Life Cycle) focuses on testing activities, ensuring software quality, while SDLC (Software Development Life Cycle) covers the entire development process, from planning to deployment.
Is STLC a part of SDLC?
Yes, STLC is a subset of SDLC. It begins after the requirements phase and runs parallel to development to ensure defects are identified early.
Why is STLC important in software testing?
STLC ensures a structured approach to testing, reducing defects, improving software quality, and ensuring the final product meets requirements.
What happens if a phase in STLC is skipped?
Skipping any STLC phase can lead to missed defects, improper test planning, or inefficient execution, increasing overall project risks and costs.
Which phase of STLC is the most critical?
All phases are important, but Test Planning and Test Execution are crucial as they define strategy and validate the software against requirements.
What is the role of test automation in STLC?
Test automation is integrated into Test Execution to speed up testing, reduce manual efforts, and ensure consistency in repetitive tasks.
How do defects get managed in STLC?
Defects are logged during Test Execution using bug-tracking tools like Jira. They are categorized, prioritized, and fixed before retesting.
Can Agile and STLC work together?
Yes, STLC can be adapted into Agile by following shorter testing cycles in each sprint, ensuring continuous feedback and iterative improvements
How does STLC help in risk management?
STLC identifies risks early through proper test planning, risk-based testing, and defect tracking, ensuring better project stability.
What tools are commonly used in STLC?
Popular tools include Jira, Selenium, TestNG, JMeter, Postman, and HP ALM for test management, automation, and performance testing.